In Summer ’23, admins can start taking advantage of reactivity with reactive formulas. Read this blog post to learn why reactive screens will transform the screen-building game for Flow and for the Salesforce platform as a whole. Then complete the Learn MOAR Summer ’23 for Admins trailmix to earn a special community badge.
Before we dive into what’s new in Summer ’23, let’s take a closer look at how reactivity impacts you and your team, the fantastic improvements it will make for your users, and what the roadmap looks like for fully reactive screen flows.
Introducing reactive screen components (Beta)—the next generation of form building
We revealed reactive screens at TrailblazerDX in this session (that we highly recommend you watch) where we showed reactive screen components in action. We were blown away by the reaction! This was one of the most popular sessions at TDX and Salesforce+, and we can’t wait to take it across the finish line later this year.
Let’s dive in.
Reliance on the “Next” button creates end-user friction
I love screen flows. I wouldn’t be a product manager on the Flow team if it weren’t for all the amazing, time-saving wizards I built for clients and the community as a solution architect. However, there’s one thing that always frustrated my users and me, and that is how often you had to press Next just to get some visual feedback in a component on the screen.
A bit of technological background here: When you hit Next, you’re sending all the information about what the user did to our server. The server then processes the response and then sends all that information back to the client, your browser.

This overreliance on server-side computations can lead to mistakes, flow abandonment, and decision fatigue. And in some cases it just isn’t the right tool for the job, such as in long-form application scenarios.
Reactive components will change the screen flow game
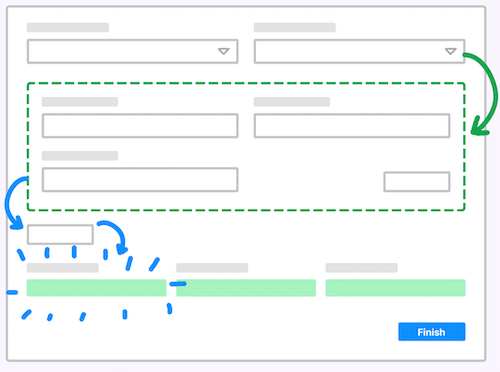
We plan to solve this overreliance on the Next button with reactive components—the future for screen flows. With reactive components, the components you place on your screens are now completely aware of what’s going on with other components on the same screen. With reactivity, your flows are now less reliant on the server (what happens between screens) and more reliant on the client (what happens on the screen).
This focus on client-side behavior means you’ll now be able to create bigger, more tailored screens for your users without them needing to hit that Next button nearly as frequently. Imagine consolidating multiple screens into a single screen—simplifying your Flow canvas and the user’s experience when running the flow. Users won’t be stuck trying to remember what they entered on the last screen—all the information they need will be within a single screen.
Reactivity empowers admins and developers

Not only will reactivity change the game for your users, but it will also vastly improve your experience building flows.
Before reactive components, to get “app-like” experiences where components could communicate with one another, developers would’ve needed to create large, monolithic components that were essentially unusable outside the context of that flow screen. You couldn’t even use standard flow components in tandem with your custom components to achieve reactivity—it all had to be self-contained.
Those big custom components were single use, single purpose, and costly to maintain and change. Plus, they didn’t foster much collaboration between flow builders and developers.

We’re changing the game with screen flow reactivity. Developers can create smaller, multi-purpose components to use in any screen flow to help deliver fully dynamic screen flows. These modular components will multiply your team’s impact and productivity in the organization.
With reusable components, admins don’t need to go to their developers or consultants for small changes to those big monolithic components anymore. Now, admins, you can just go to your big bag of building blocks and pick out what you need to create the dynamic, reactive screen flows you’ve always wanted without any additional help. Best of all, you can use a mix of standard, AppExchange, and open-source components to further save time.
Lastly, because you’ll be reducing the number of screens in your flow, you’ll also be streamlining your Flow canvas too. Check out this latest post from Tamar Erlich on UnofficialSF. She was able to consolidate a screen flow that was once seven elements and shrink it down to one screen! Wow.
What is possible today and in the future?

Many of you were beyond excited at the above animation I shared on LinkedIn a couple weeks ago as an early preview of what’s coming in the upcoming Summer ’23 release: reactive formulas. What may not be immediately clear, though, is what functionality Reactive Components Beta unlocks. And, we’ve got big plans for what’s next.

To put it simply, fully reactive screen flows will take time as we make the various components and Flow features reactive-ready. Our goal in the beginning is to make it possible to create fully dynamic screen flows by unblocking developers and advanced builders. We expect ISVs, advanced admins, and internal Salesforce teams building on Flow will start to flourish with what we’re delivering. As we move from release to release, we’ll make it easier and faster for everybody, including admins and low-code builders, to create dynamic screens.
In Spring ’23 we released the initial Beta of Reactive Components where a subset of components could “react” to a change in another component on the screen.
Summer ’23 introduces no-code reactive formulas (Beta)
In Summer ’23, admins and no-code flow builders can start taking advantage of reactivity with reactive formulas as part of the Reactive Components Beta.
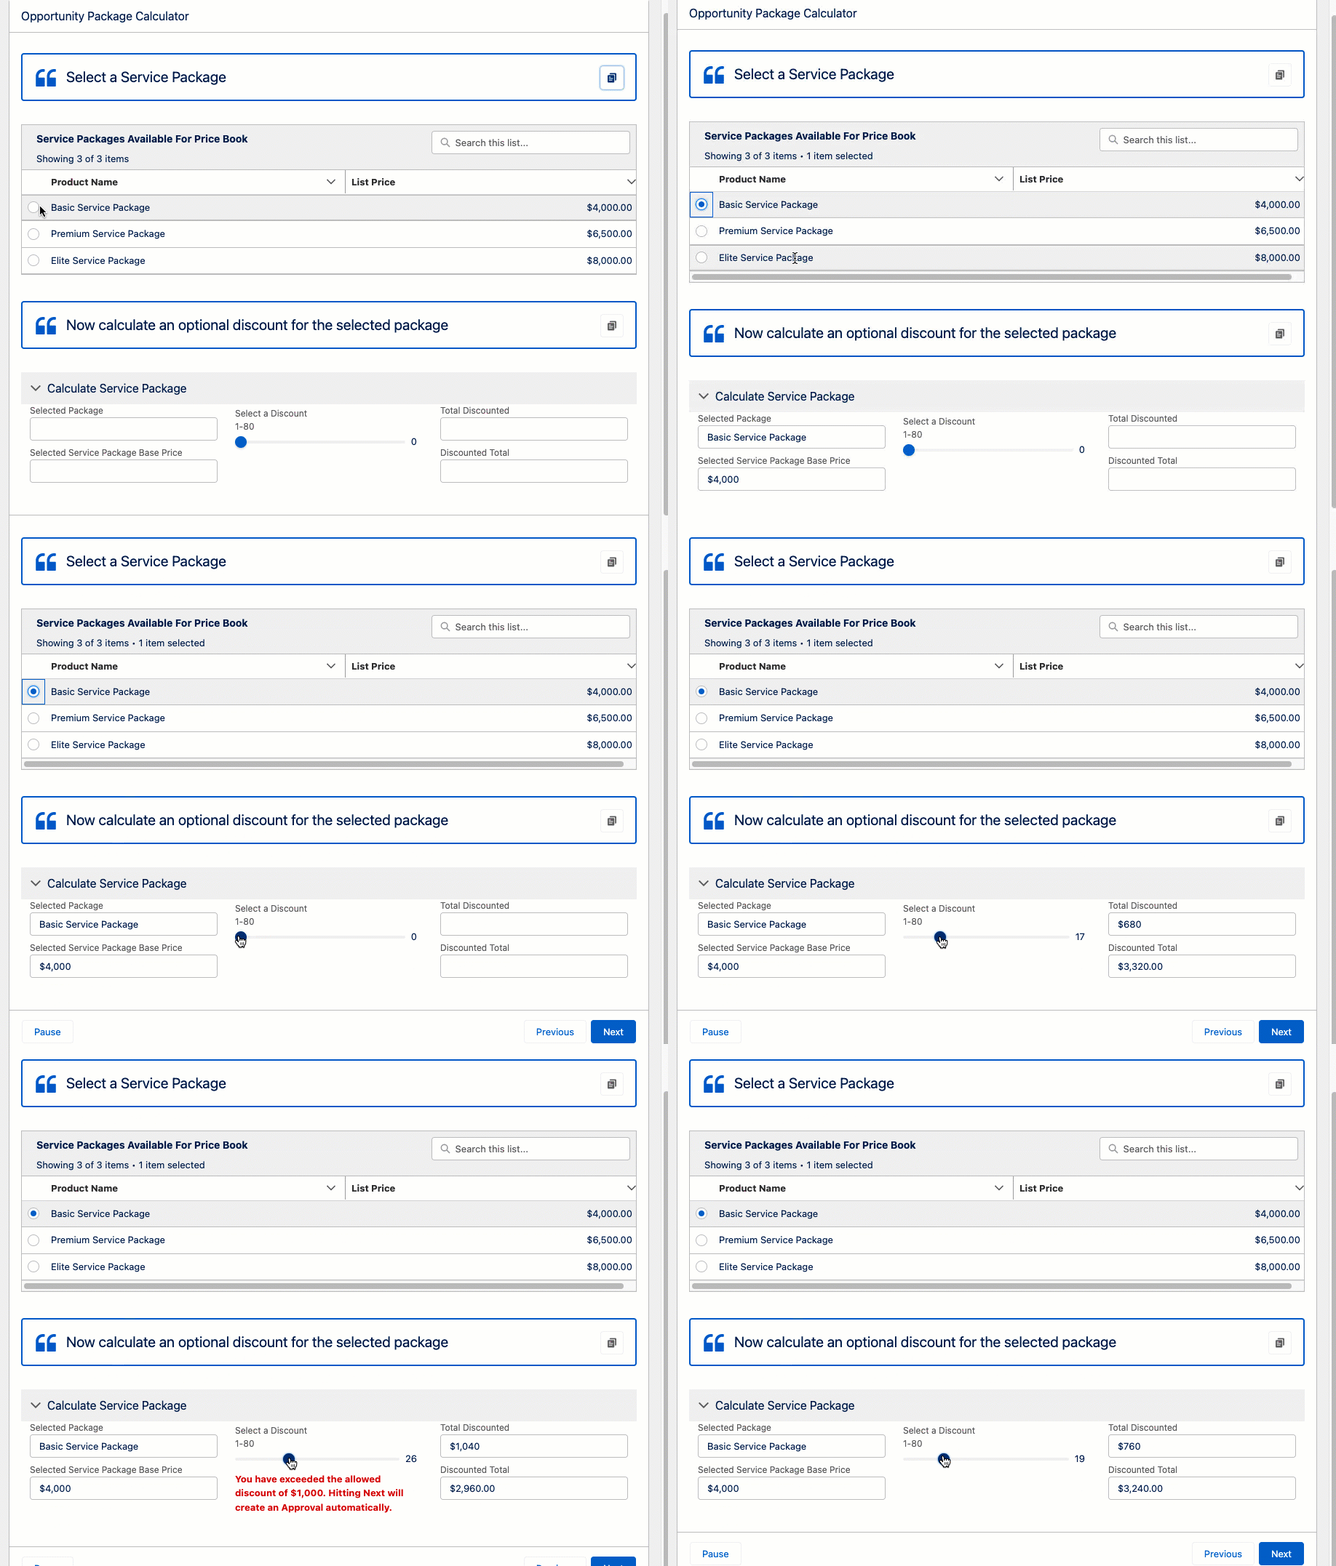
Screen flows will soon be able to perform real-time calculations and logic when changes happen on the screen for supported components and formula functions. One of my favorite components to show off reactive formulas is the Slider component. Check out the animation below.
I first select a service package from a price book, then calculate a discount off of the selected package. As I move the discount slider, the Total Discounted and Discounted Total amounts change with the slider. Want to know the best part of this? Zero code or custom components! So cool!
I created the auto-calculated Total Discounted field by setting the Default Value of a Currency component to a formula resource:
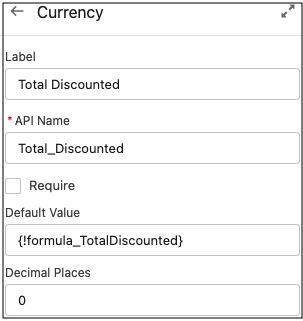
That formula resource, {!formula_TotalDiscounted}, has a value of:
{!Selected_Package_Amount} * ( {!Discount_Percentage_Slider.value}/100 )
You can view the list of supported functions in our Reactivity Help Doc.
The future of reactivity
We’re aiming to make reactivity generally available (GA) in the Winter ’23 release. As part of that, we’ll be adding Choice reactivity—which means features like our new Choice Lookup, Radio Buttons, Picklist, and other choice-type components can respond to and influence change in other components. Note that this will not address the holy grail use case where you select an Account in a Lookup and generate a list of Contacts in a list of Radio Buttons. That use case is coming, but at a later date.
After this becomes GA, we’ll look at making Display Text, one of the most important components, reactive. It also happens to be one of the most complex components to make reactive, which is why we saved it for last. Immediately after that, we’ll follow up with even more reactive features and components.
Making reactivity easier and more powerful
I mentioned earlier that we want to make it easier for you to build reactivity quickly. We plan to do that with our marquee feature: Action Buttons. With Action Buttons, you’ll be able to launch a flow to feed data and complex logic back into your screen to create game-changing screen flows that will look more like a full page application than an actual screen flow. Need to calculate a shipping price that feeds into a shipping calculator, or check if a particular item is in stock with an external system? All of that will soon be possible within a single screen. We hope to deliver this next year.
Here’s a roadmap for our short- to medium-term plans for enabling screen flow reactivity.

Getting started with reactivity
How do I turn on and use the Reactive Screen Components Beta?
To opt in to the Beta you need to go to the Process Automation Settings page within Setup. Scroll down to the bottom and enable the Reactive Screens Beta.

Using reactivity depends entirely on what you’re trying to accomplish in your flow. In most cases, you typically reference the component you want to control in the Default Value input or the Value input of a Lightning component.
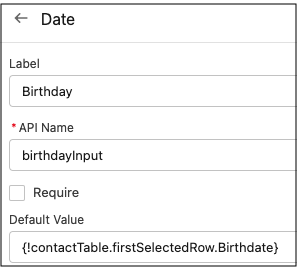
Say you wanted a Contact Name text field to be populated with the selected row of a Data Table that displays contact information. To achieve that, you’d simply map the Text component’s Default Value field to the firstSelectedRow output of the Data Table, as pictured here:
I recommend checking out the Reactivity trailmix, which has a variety of resources, such as our considerations doc that lists out which components currently support reactivity.
You’ll also want to make sure you check out our Trailblazer DX session on reactivity where I show off a flow that uses a mix of standard and custom components to create a single-screen loan calculation flow.
Lastly, make sure you follow the Flow Reactive Screen Components (Beta) Trailblazer Group—it’s the primary way I send out cool updates and use cases, and get feedback from you.
Happy Flow-building!
See Summer ’23 Flow highlights in action!
Join us on Friday, May 19 at 11:15 a.m. PT for the Release Readiness Live: Admin Preview! And tune in to Flow Release Readiness Live on Wednesday, May 24 at 9 a.m. PT. Add the broadcasts to your calendar today! And be sure to complete the Learn MOAR trailmix to discover more Summer ’23 release highlights for Salesforce Admins. If you complete the trailmix before September 2023, you can earn a special community badge!
Source: https://admin.salesforce.com/

